
Journal
Color Confidence: Test, Do Not Guess
I was visiting with one of my friends last week and our conversation turned to the Shape Shifter Community Challenge. She is planning to make a handbag and she wanted my opinion on which Paintstik colors would look best on her fabric.
I remembered a fantastic idea for testing colors from Nancy Kazlauckas, as well as a guest article that she wrote for me several years ago. With our Challenge underway, this is a great time to pass on Nancy’s advice to everyone in the Community.
Here are Nancy’s thoughts on testing colors (at the end of the post, I’ll add a quick set of instructions, along with a few additional photos from her color test):
I painted a jacket for the 2010 Bernina Fashion Show, and Shelly was able to help me with the colors I wanted to use. Shelly knows her colors – so the various shades of the greens, blues, purples, both matte and iridescent, played well together on the final piece. Before I started painting on the jacket fabric, I tested each of the colors to make sure I knew what it would look like.
 Every time I work on a new piece of fabric and want to achieve my “vision,” I do a color sample on the fabric I am using for my project. I make a note as to the color of the paintstik, and then do a small (1” x 1”) stencil (applying the paintstik using a brush) and a rubbing (doing a rubbing using the paintstik directly on the fabric). Then when I am painting my final piece, I can reference the sample so I know what color I will get when I pick up the brush or the paintstik.
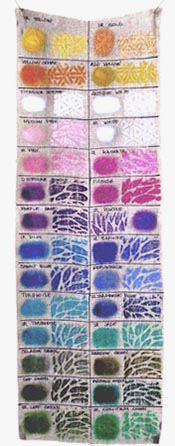
This is the sample I used for the jacket. It was neutral linen fabric, but I needed to know what the iridescent blue or teal was going to look like next to the matte turquoise or green.
Before making the background rubbings, I sprayed the rubbing plates with a temporary adhesive, and the linen fabric stayed put for me to achieve a nice clean rubbing of the image. Without the temporary adhesive, the linen fabric would slip all over the place, and the image would be broken and distorted.

As you can see, this is one fantastic jacket! Here’s how you can do Nancy’s Color Test for your projects:
 Step 1: Write Color Names on Palette Paper and Apply Color
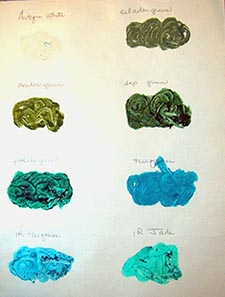
Nancy’s first step was to gather up all of the colors and put each one on palette paper. She labeled each color on the paper to make sure she knew exactly what she was working with. If you are only testing a few colors, you can probably get by without labeling the palette paper, but Nancy tested 28 colors and it was really important to keep them all straight.
Step 2: Make Grid on Fabric and Add Test Colors
Her second step was to draw a grid on a piece of her jacket fabric and label each section of the grid with a color name.
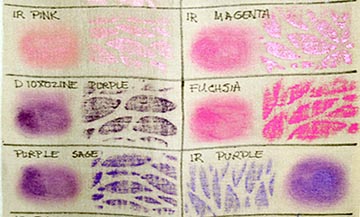
With the first color in the test, she applied a small section of color with a stencil brush and made a small rubbing.
Step 3: Repeat For Each Color In Your Test
By adding each of the colors that she might want to use to her test strip, Nancy was able to audition the colors before actually adding them to her jacket fabric. You can too!
When you do a color test for your project, you will be able to see how each color interacts with your background color, and you can fold the fabric as needed to see how 2 colors will look next to each other.
Nancy’s color test is the best possible way I know to boost your confidence in the colors you choose for your project. A huge thanks to Nancy for sharing this great tip with everyone in the Community. This is one fantastic idea that will never go out of style!
P.S. Nancy’s jacket was featured in the October/November 2012 issue of Vogue Patterns Magazine. I’m not sure if issues are still available, but if you see one, it’s worth picking up.
Great article! Thanks for the testing instructions. I also would love a printer friendly format. Resorting to copying and pasting into a Word document.
I’m looking forward to working with my paint sticks in this manner. I’m new to this site and have learned so much already.
Woohoo! Welcome — and I’m delighted that you are finding lots of cool stuff here. I love hearing that we have happy readers. 🙂
What a great idea! I have wanted to try paintstiks on a couple of fabrics but haven’t had the courage to do it yet. Now I know what to do so I can be successful. Thank you for sharing!
You are most welcome, Alice. We are all lucky that Nancy is such a thoughtful artist and teacher. her color testing idea is one of the best!